Time-Saving Tips: Working with the Canvas Calendar
Whether you’re teaching in the summer or taking a well-earned break from all things Canvas, we want to make sure you’re ready to make the most of the Canvas calendar function when you go to build your next course site.
Available in the global navigation menu of Canvas (far left side of the screen), the calendar in Canvas pulls dated items from all of your Canvas courses, such as assignment due dates and scheduled Zoom meetings. You can also create special meeting types and add other course-related items via the calendar. Read on for two tips and two pitfalls to avoid when using the Canvas calendar.
Tip 1: Use the Appointment Group Scheduler to Manage Office Hours and Other Student Meetings
If you’re drowning in student meeting requests and trying to manage your office hours time more efficiently, use the Canvas calendar to create appointment times that students can view and schedule. This can be used to arrange one-on-one meetings, small-group or student project group meetings, student presentations, or any other meeting type.
You can set limits on the appointment group, such as only allowing a certain number of students to sign up in a time slot or restricting students to a specific number of appointments. Additionally, you can make a set of appointments available to multiple classes in Canvas so your office hours can be class-specific or open to any of your current students.
Once published, your appointments will be visible to students in the relevant course(s) in Canvas when they go to the calendar area of Canvas. Students can then reserve their time with you according to the settings you selected when creating the appointment group. You can edit your appointment groups after they are created, see who has signed up for specific times, and message students who have signed up for a time.
- For more information on setting up Appointment Groups in Canvas, review the Canvas Guide for Adding Scheduler Appointment Groups.
- For existing Appointment Groups, read more about how to View or Edit Existing Scheduler Appointment Groups.
- If you utilize this feature, you should provide your students with this Canvas Student Guide for Using the Appointment Scheduler.
Tip 2: Add Calendar Items to Increase Visibility of All Course-Related Tasks
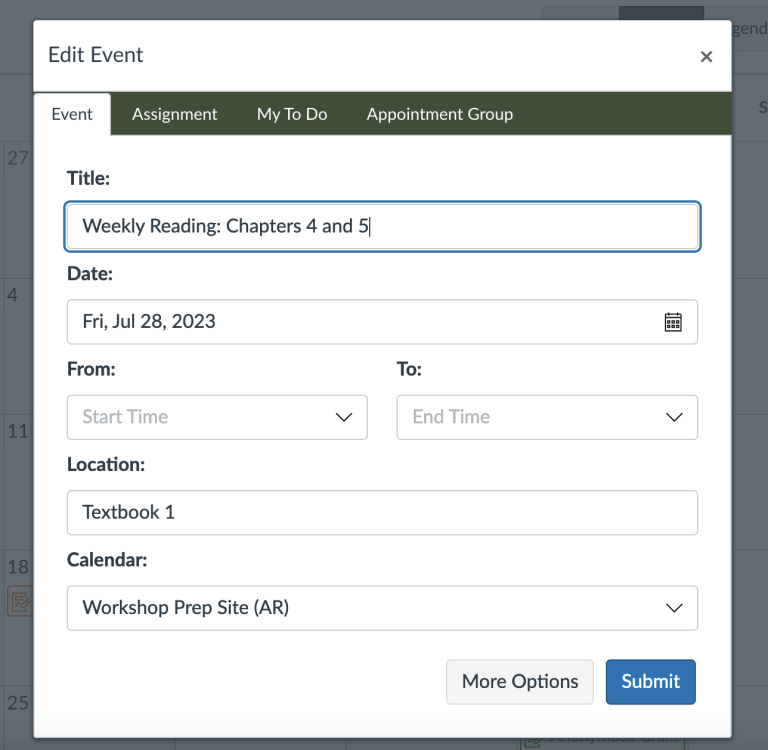
While your students appreciate when you add your quiz, discussion, and assignment due dates to your Canvas course, you can take things to the next level by adding other course-related tasks to the Canvas calendar. Whether it’s the course reading assignments or planning steps for major projects, adding these items to the calendar will allow students will see them on their Canvas calendar, thus making your course expectations more apparent and teaching students how to be successful in your course. Calendaring course-related activities will allow students to better plan their time and manage the many requirements of all their courses.
These added calendar items will also be visible in the course summary on your course syllabus page in Canvas.
For more information, review this Canvas Guide for Adding an Event to a Course Calendar.
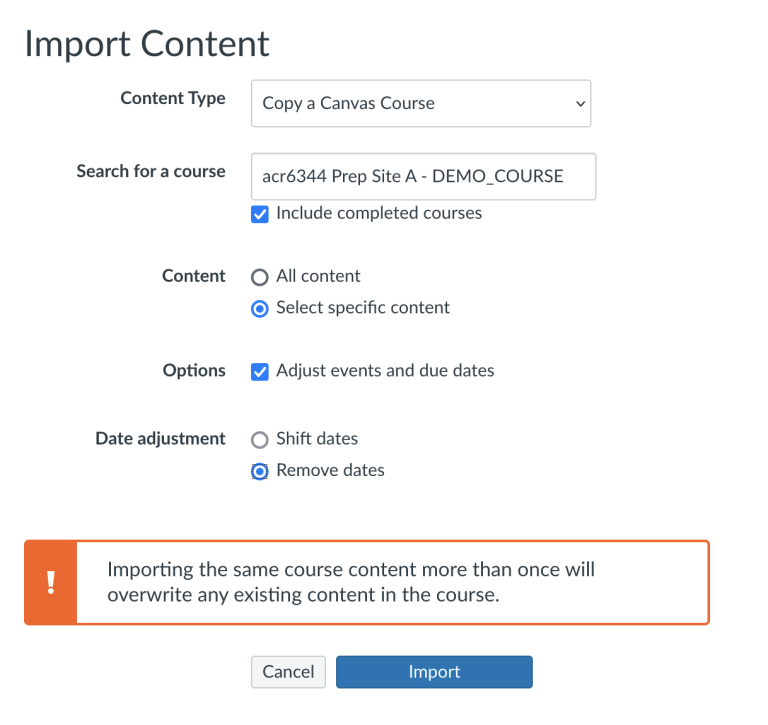
Pitfall 1: Importing Old Zoom Meetings to Your New Course
When copying your Canvas course content from the last time you taught a course into the new course site, be selective in your import to avoid bringing over old calendar items. Specifically, when using the Course Import tool to bring content into the new course site, be sure to check “Select specific content” when prompted, then select the content areas during the import process.
If you happen to import old Zoom meetings or calendar items into your new Canvas course, you can remove those manually in the calendar area. The Agenda view of the calendar (selectable in the upper right corner of the calendar) makes seeing the calendar items for just one course easy to locate and delete accidentally imported calendar items. Feel free to reach out to Teaching & Learning Technologies for assistance with this process to ensure you don’t accidentally delete items from your new Canvas course in this process.
It’s also best practice to remove dates from assignments during the import process. This will take away any due dates from your quizzes, assignments, and discussions as well as the posting dates for your announcements and any other scheduled release dates. This means that you’ll need to go through the new course carefully to add the appropriate dates back onto these course items. While this creates some additional work for you during your course setup process, it ensures that everything happens in your new Canvas course exactly when you want it to happen.
Pitfall 2: Beware! What Happens in the Calendar is Reflected in the Course
As you explore the Canvas calendar, be aware that what you do in the calendar is reflected in your Canvas course. For example, if you delete an assignment from the calendar interface, that assignment will also be deleted from your Canvas course site (including any submissions already received from students!) While erroneously deleted items may be recoverable with the help of a Canvas administrator, it’s best to tread lightly when deleting items from the Canvas calendar.
If you need to turn off calendars to be able to better see the items from a particular course, you can toggle course calendars on or off in your list of courses (on the right side of your calendar screen). You can also view one course’s calendar items in the Agenda view of the calendar.
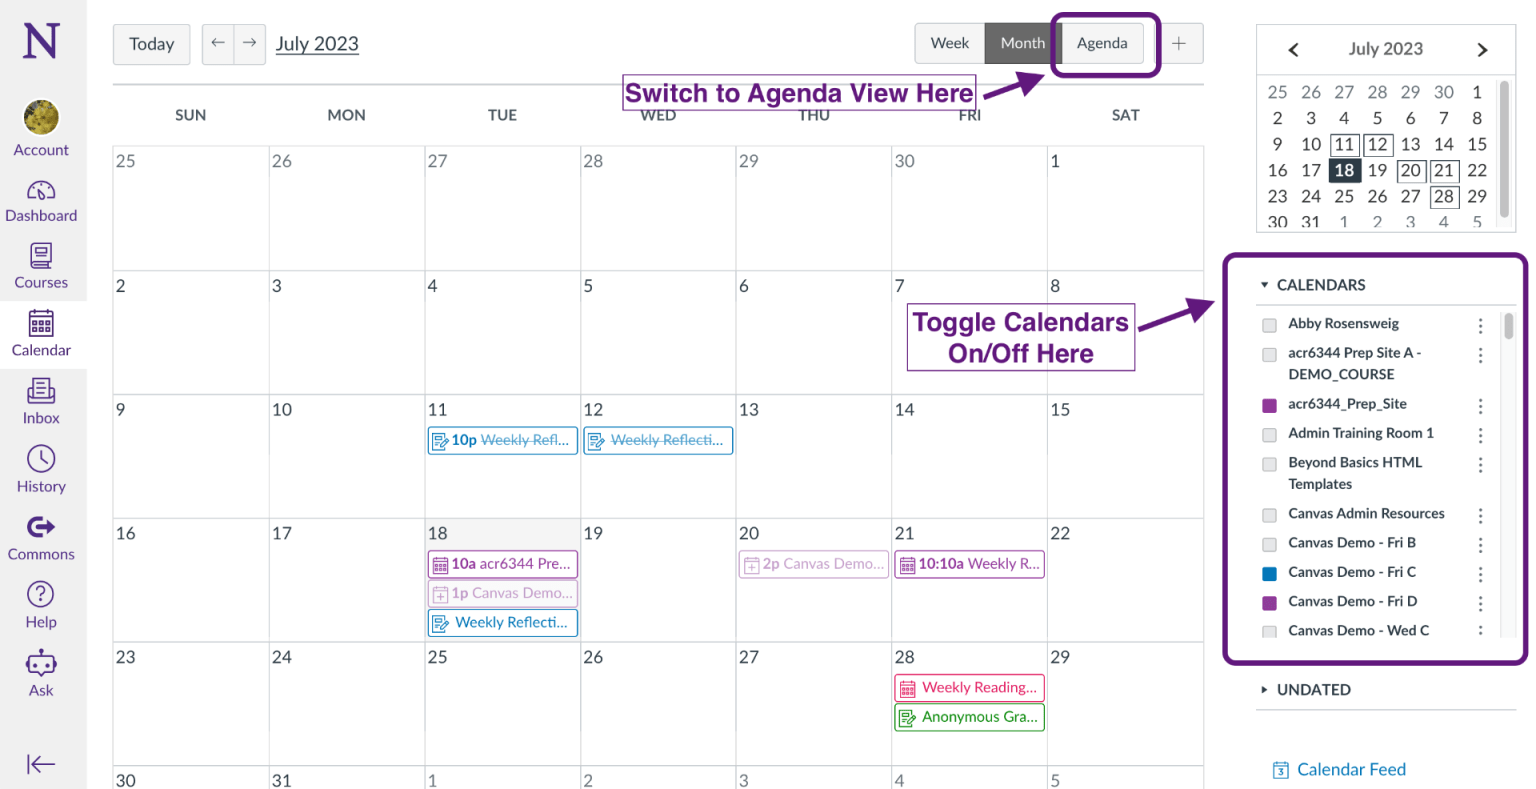
Toggle calendars on and off or use Agenda view to find items for a specific course.