Time-Saving Tip: How to Take Advantage of your Content Already in Canvas
Time-Saving Tip: How to Take Advantage of your Content Already in Canvas
As you get ready to build out your Canvas course for winter quarter, you may have content from a previous course that you’d like to import to your new course. Canvas makes this process easy.
Course Import Tool
Most instructors will import their content from previous courses using Canvas’s course import tool. This tool allows you to pull content into your new course from a previous course. In short, you will access the tool from your new course’s Settings menu (on the right side of the screen). You then select “Copy a Canvas Course” from the content type drop-down menu and start typing the course name in the search field and select the course from which you are importing. You will have the option to select specific content from the course or import all content; we recommend selecting specific content. You can also adjust the event and due dates or remove them entirely; we recommend removing them.
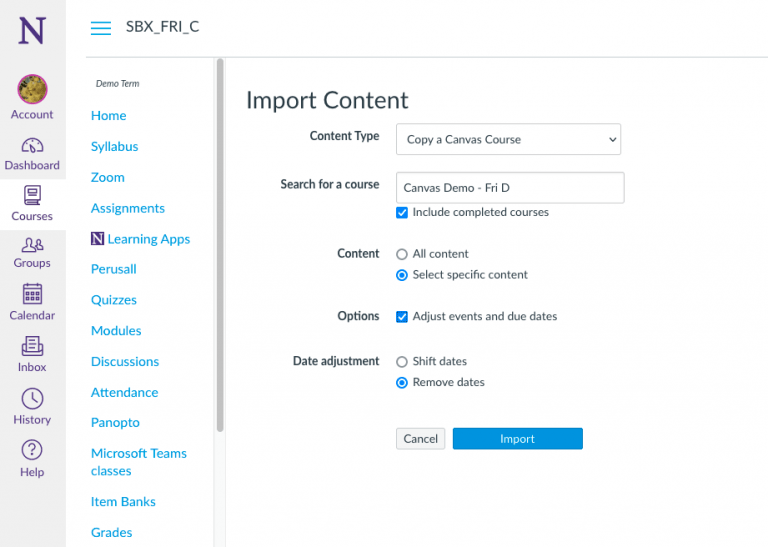
Selecting specific course content (as opposed to importing all content) allows you to avoid importing unintended items. For example, you may wish to set your new course’s settings manually instead of importing them to ensure you have all your settings exactly as you intend them to be.
Selecting content will also allow you to avoid importing old calendar items, such as Zoom meetings. During the course import process, you should not check “Calendar Items” when selecting your content to import.
More detailed instructions for using the course import tool
More information about keeping the ghosts of Zoom meetings past out of your new Canvas course
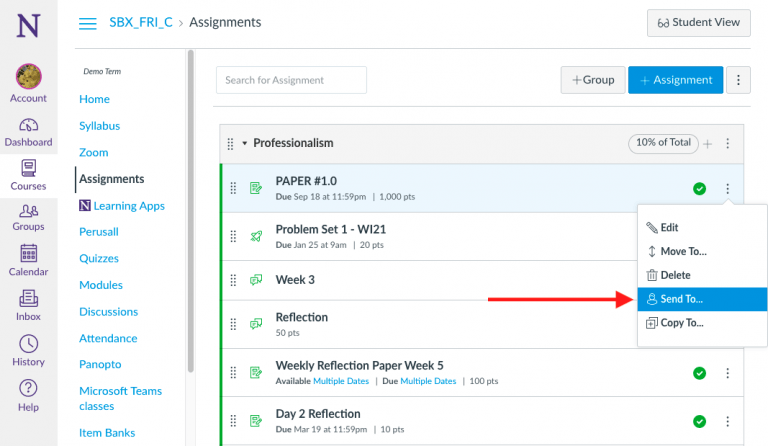
Send To Function
Canvas also allows you to send content, such as an assignment or a module, to other instructors in Canvas. From the content item, the options drop-down menu (depicted by three stacked dots), you will see “Send To…” as an option for any item for which this function is possible. You will be prompted to enter the name or email address of the recipient. You can send an item to multiple recipients at the same time. The recipient(s) will then receive the item in their Shared Content area of their account menu in Canvas, along with a notification badge alerting them to the shared content.
The following Canvas guide shows steps for sending course items using the Send To feature (while the guide focuses on modules, the process is the same for other course item types).
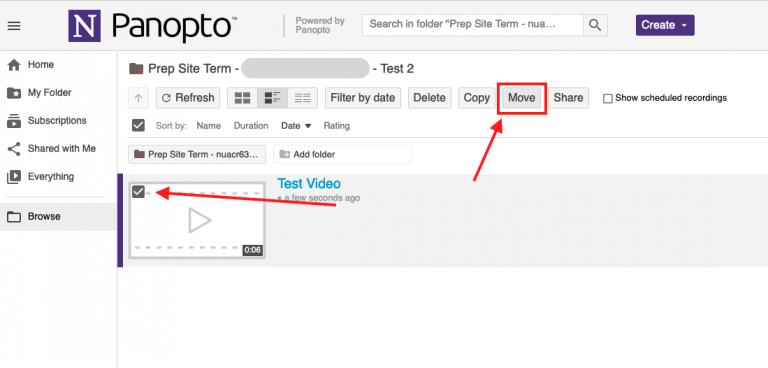
Moving Panopto Videos
If your previous course had videos hosted in Panopto that you’d like to move to your new course, such as pre-recorded lectures, you will need to move the video in Panopto to make it available in your new course. To do this, you will need to log into Panopto in your browser, select the video, and then locate the folder to which the video should be moved. Detailed instructions of this process are available in the Panopto Instructor Training.